
Translated with the help of AI. We apologize for any errors and would appreciate your help in correcting them.
Translated by order of the educational portal university.poker
Original source: GTO Wizard

A “sticky” player to your left, who often calls your raises on the pre-flop and does not give up easily after the flop, can become a serious headache.
It's kind of annoying that your options are limited. When you are without a position, this is a big disadvantage, sometimes so insurmountable that you just have to give up. Its “stickiness” is not always a mistake. But there are players who fight too hard and think that you can always steal every flop that clearly did not suit the openraiser. In this article, we will look at how to exploit them, turning their stubbornness to their advantage. This article is about regulars who use the position to gain an advantage, about how to play against too loose opponents without a position was discussed in another article.
1. Test scenarios
These scenarios begin with 30bb deep catoff (CO) versus button (BTN) button ranges. In these positions, you are more likely to play sweats without a position as a pre-flop racer (PFR), and at this stack depth, it will be easier to exploit the player's excessive stubbornness on the BNT. The deeper the stacks, the more correct it will be for your opponent, who is in position, to be sticky on the post-flop and the less opportunities you will have to exploit it.
We will look at two flops:
![]()
![]()
![]() ,
,
- where CO has a significant range of continued bet in the equilibrium strategy,
![]()
![]()
![]() ,
,
- and where CO checks its entire range.
I chose these flops because a cold collar is most likely to be stubborn on them. The flops with the elders Tuz-hai and King-hai are usually perceived as favorable for the player who made the raise, and they are easier to play without a position. Consequently, on such boards you are less likely to meet opponents who float and bluff as a bluff. For each board, we will compare the equilibrium strategy of CO c-bets with the changed BTN strategy, where it will fold on any size 2 times less often.
Except for the all-in, against which our opponent will no longer have the opportunity to call to overplay us on the post-flop. We will also consider how the CO turn strategy should change after the bet on the flop against such an opponent. The bet size options on the flop for both players are 20%, 50% and 80% of the pot or all-in pot. Options for later streets are set using the “Automatic” function in the Custom Solving section.
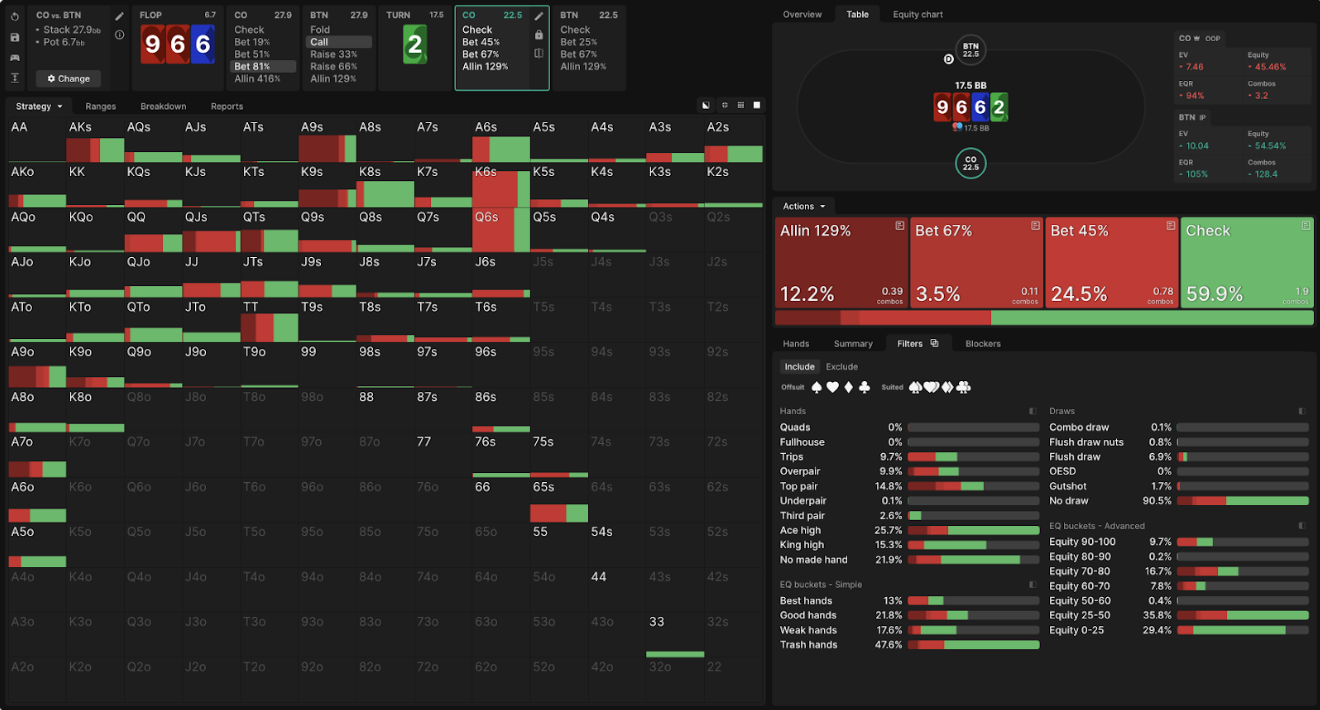
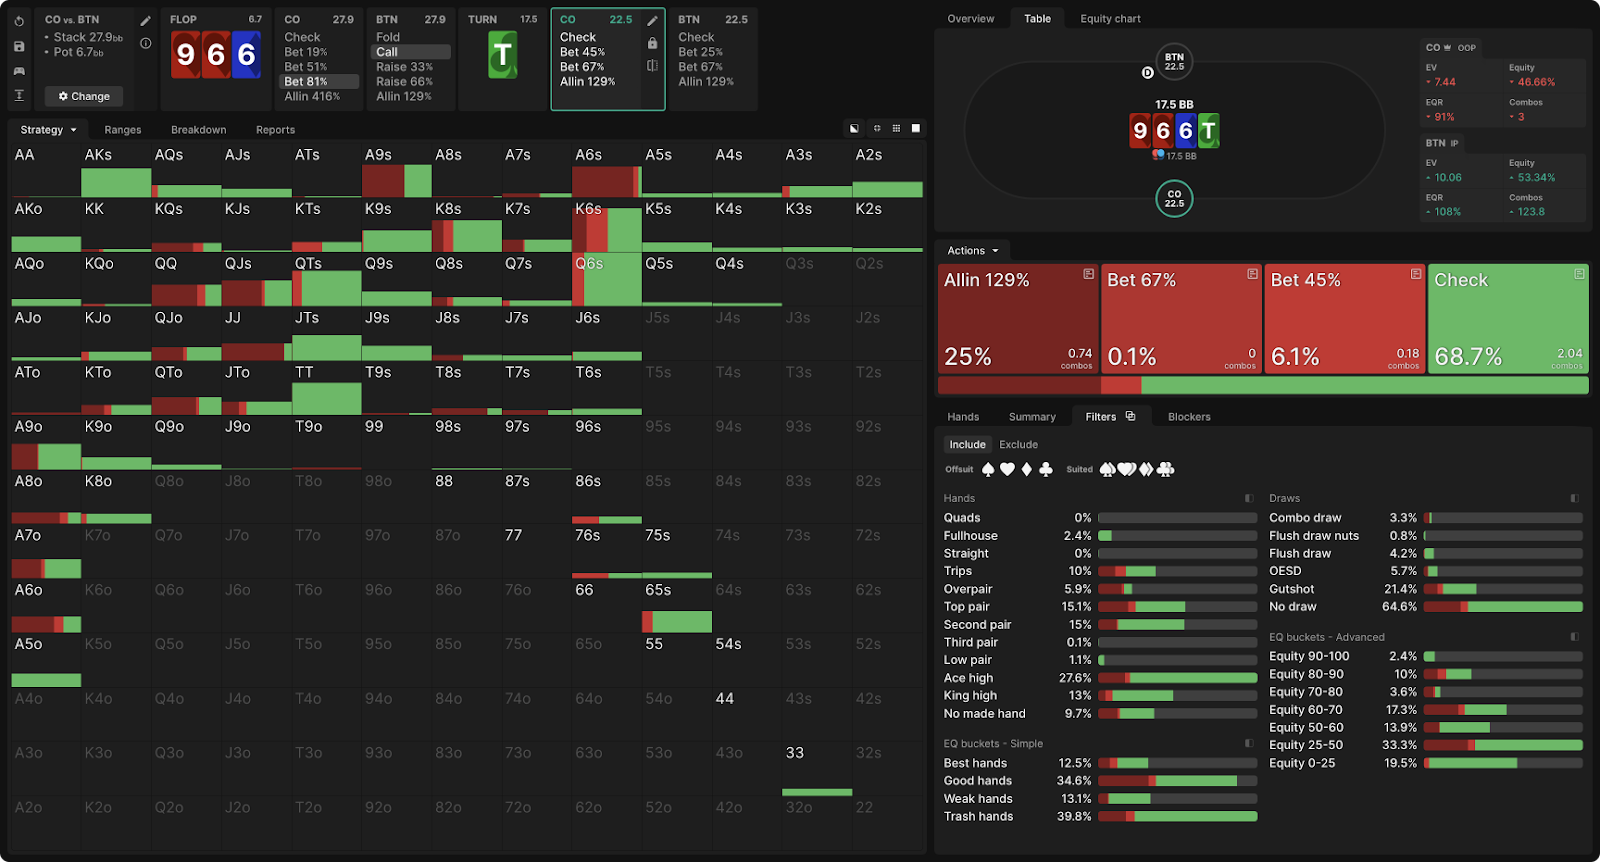
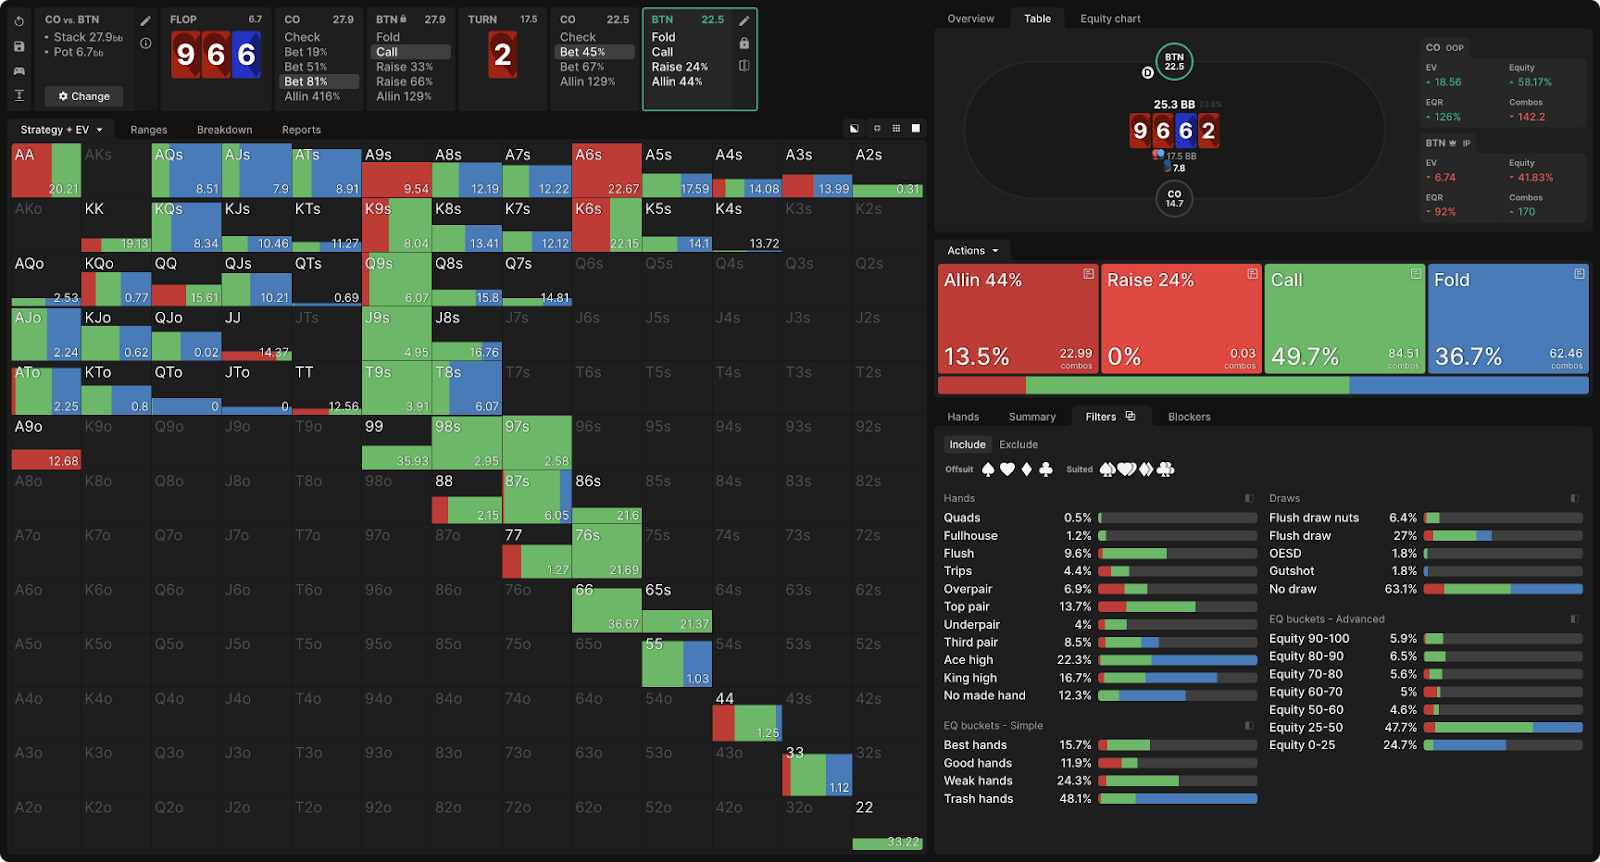
2. cbet on the flop with Tuz-hai
- Despite all of the above, CO actually has a slight edge in equity and in nuts combinations on the flop:
![]()
![]()
![]()
There are more than 6 or more overpairs in its range, which are also very strong on this board.

Comparison of the range of CO and BTN. CO - blue, BTN - green. From left to right - the strength of the hands in their range. On the left are the weakest arms of the range, on the right are the strongest arms of the range. In this example, the middle part of the CO range is stronger than the middle part of the BTN range.
Only the dynamism of the board favors BTN, whose position will allow making more informed decisions when changing the texture of the board on subsequent streets. But since both players have such wide range, only a few cards on the turn will dramatically change the dynamics. As a result, CO continues to put 50% of the pot at about half of its range.

In equilibrium, BTN folds at this bet about 28% of the time.
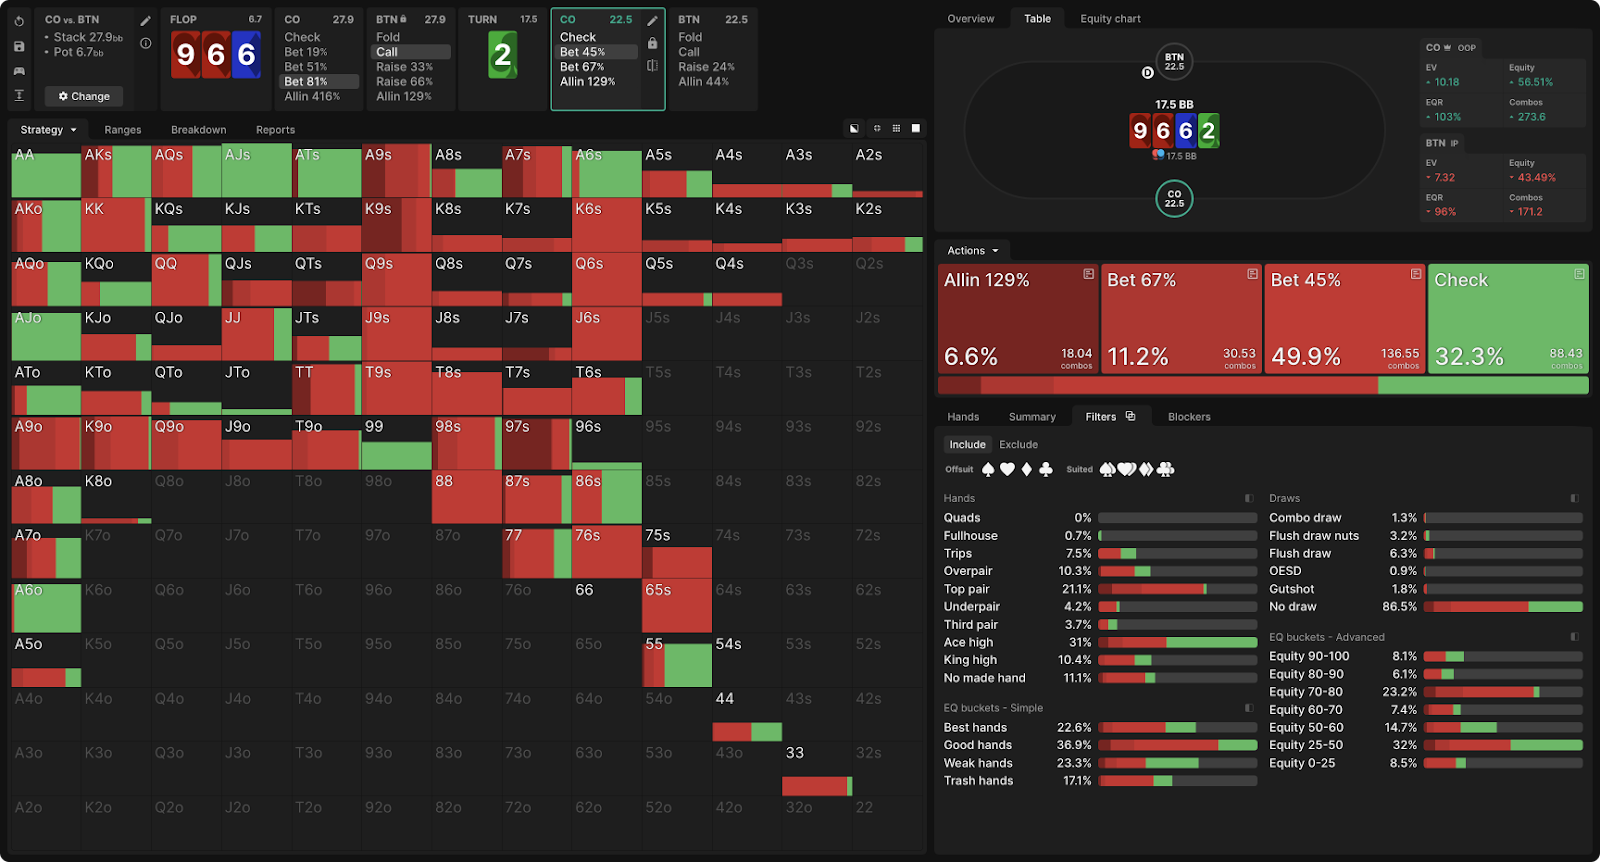
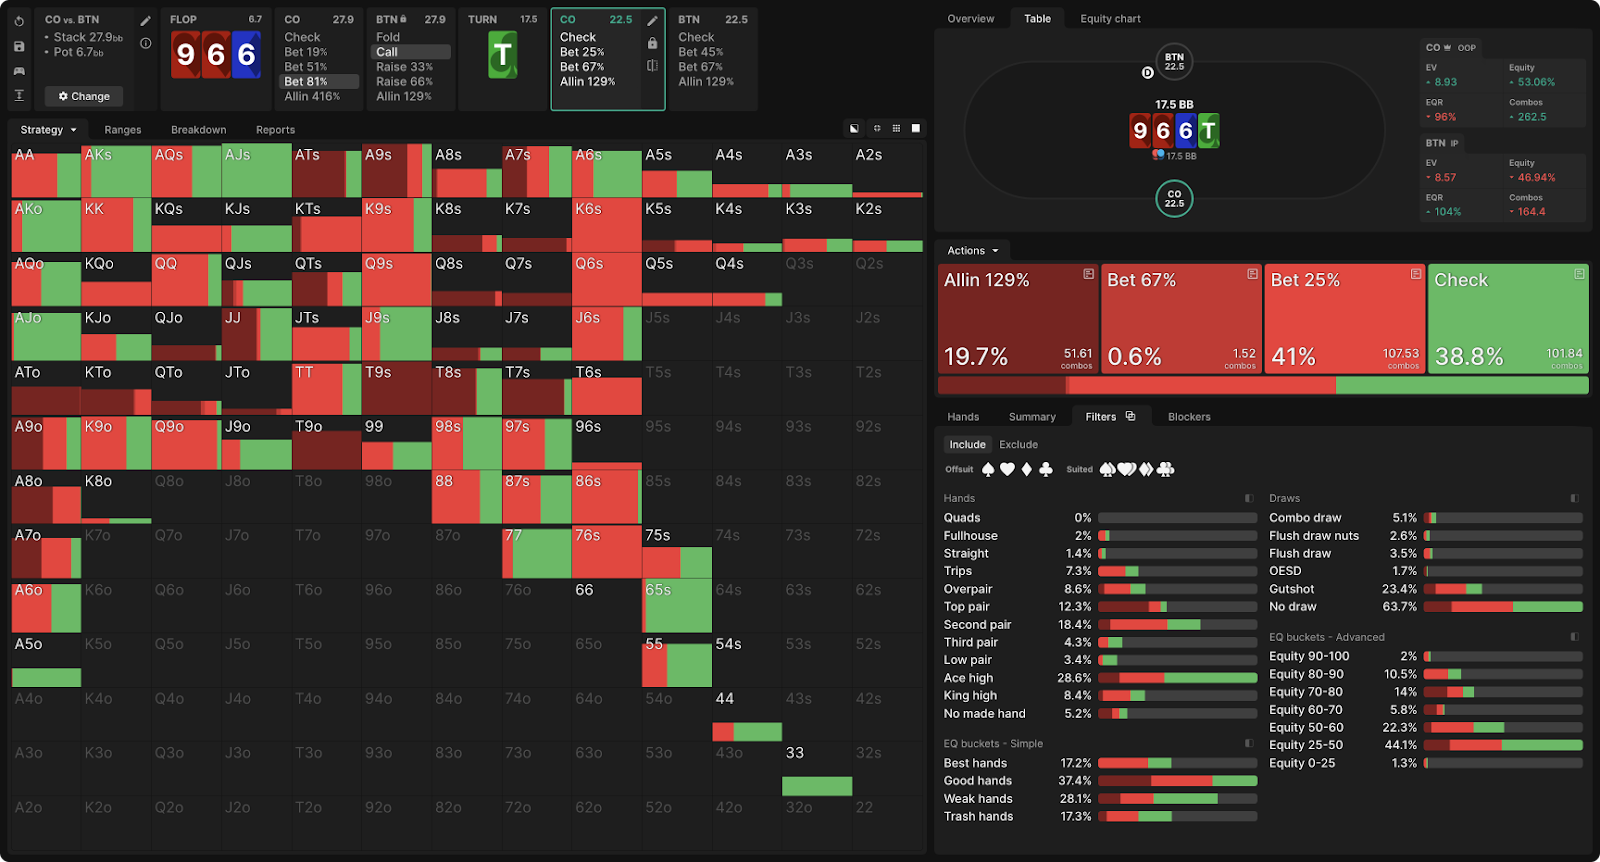
Let's see how the CO strategy changes when we set BTN folds half as often at any of these bet sizes:

SO makes bet much more often and completely ceases to use the size of half the pot. Bet in 80% of the pot takes precedence, but the bet in 20% of the pot also finds significant application. So called “Manhattan charts” give a better idea of what is happening. In a state of equilibrium, CO bet comes from the entire spectrum, with the only noticeable pattern being a slight preference for bet with stronger hands.

This is typical of playing out of position, especially on a dynamic board.
Withholding information is paramount, and CO has many different types of hands in both the bet and check ranges. When CO realizes that BTN will call too often, it loses the incentive to hide information in most cases. He constantly makes big bet with his strongest hands ("Strongest" here includes even some hands with equity less than 50%), makes small bet with lesser hands and checks with the weakest hands.

The reason for withholding information is to prevent your opponent from playing right against you. If you think that it will not play correctly, you can refuse to withhold information and take advantage of the imbalance you expect. In this case, it basically means big bet. If you can predict that your villain will to call or raising too often, you can refuse to hide information and take advantage of its imbalance. There are no clean bluff here. Do not bluff against an opponent who calls too often, but there are many semi-bluffs with hands with 25-50% equity.
Why does CO bet on an opponent who he knows rarely folds with unwanted hands?
Two reasons:
- Most of these hands have too much equity to be check-folded, so they will bet chips against BTN's best hands, no matter how it reacts. Bet allows him to also bet chips against some of BTN's weaker hands, those that should fold but with which the sticky player will continue. Against this part of the BTN range, these hands may well work.
- Too wide a call on the flop will cause BTN to have many weak hands on the turn. One way to take advantage of this is to place a bet on the flop with strong hands, as we see Co. doing here. Another way is to aggressively barrel on the turn to force weak hands to fold. Many of the CO bet on the low equity flop would be good candidates for a barrel on the turn.
3. turn barreling
Although we cannot generate reports on individual decisions (yet), we can “selectively check” several turn maps to understand how the CO barrel strategy is changing against the “sticky” BTN.
In considering these scenarios, let's keep a few things in mind:
- The only imbalance that we allow in the BTN strategy is an insufficiently frequent fold for bet on the flop. This means that in these simulations it is assumed that the button will play optimally on the turn. He will still be at a disadvantage due to the fact that he will come out on the turn with too weak a range, but these simulations are not based on any assumptions that BTN will play wrong on the turn. A real opponent who floats aggressively on the flop could just as well bet too often when he was made a check on the turn, which would increase CO's incentive to make a check-raise, but such an assumption is not reflected here.
- Comparison of equilibrium and exploit strategy for CO is not a direct comparison. In fact, exploit scenarios often involve bet sizes that CO uses rarely or never in equilibrium. Thus, they reflect changes not only in the BTN call range on the flop, but also in the CO bet range. Let's start with the consideration of blank thorns.
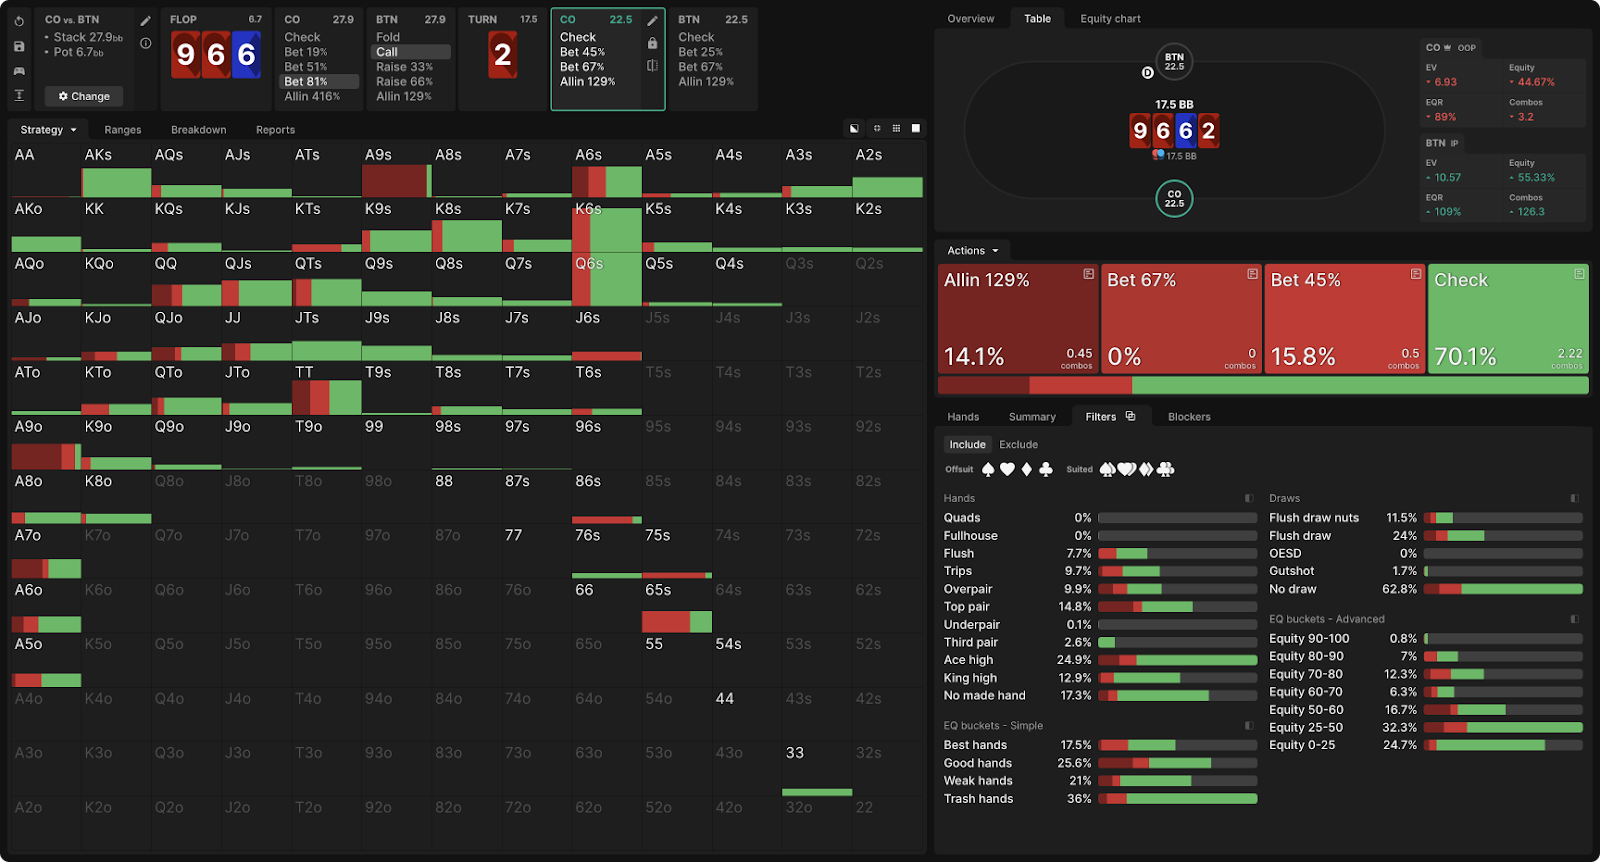
In the usual scenario, if CO bet on the flop about 80% of the pot, here's how he would play further on the turn  :
:
And here is his strategy against the button, which does not dump enough on the flop:
The main difference, in terms of frequency, is the rarer check and the greater use of a smaller bet of 45% of the pot. This reflects the above incentive to barrel into the too weak range of the BTN call. These bet are small because they target weak hands who find it difficult to continue in a position even after getting a 3-to-1 chance.
On the blank turn, the weakest part of the BTN turn range consists of backdoors that have not improved, and hands of the type ![]()
![]() or
or ![]()
![]() BTN sometimes floatit with these hands in equilibrium, but not as often as in a scenario where it sheds much less. This leads to an imbalance on blank thorns, when he has too many such hands and therefore they are vulnerable to small bet. There are fewer operating opportunities on the turn
BTN sometimes floatit with these hands in equilibrium, but not as often as in a scenario where it sheds much less. This leads to an imbalance on blank thorns, when he has too many such hands and therefore they are vulnerable to small bet. There are fewer operating opportunities on the turn![]() , which is better combined with the floating range of the BTN.
, which is better combined with the floating range of the BTN.
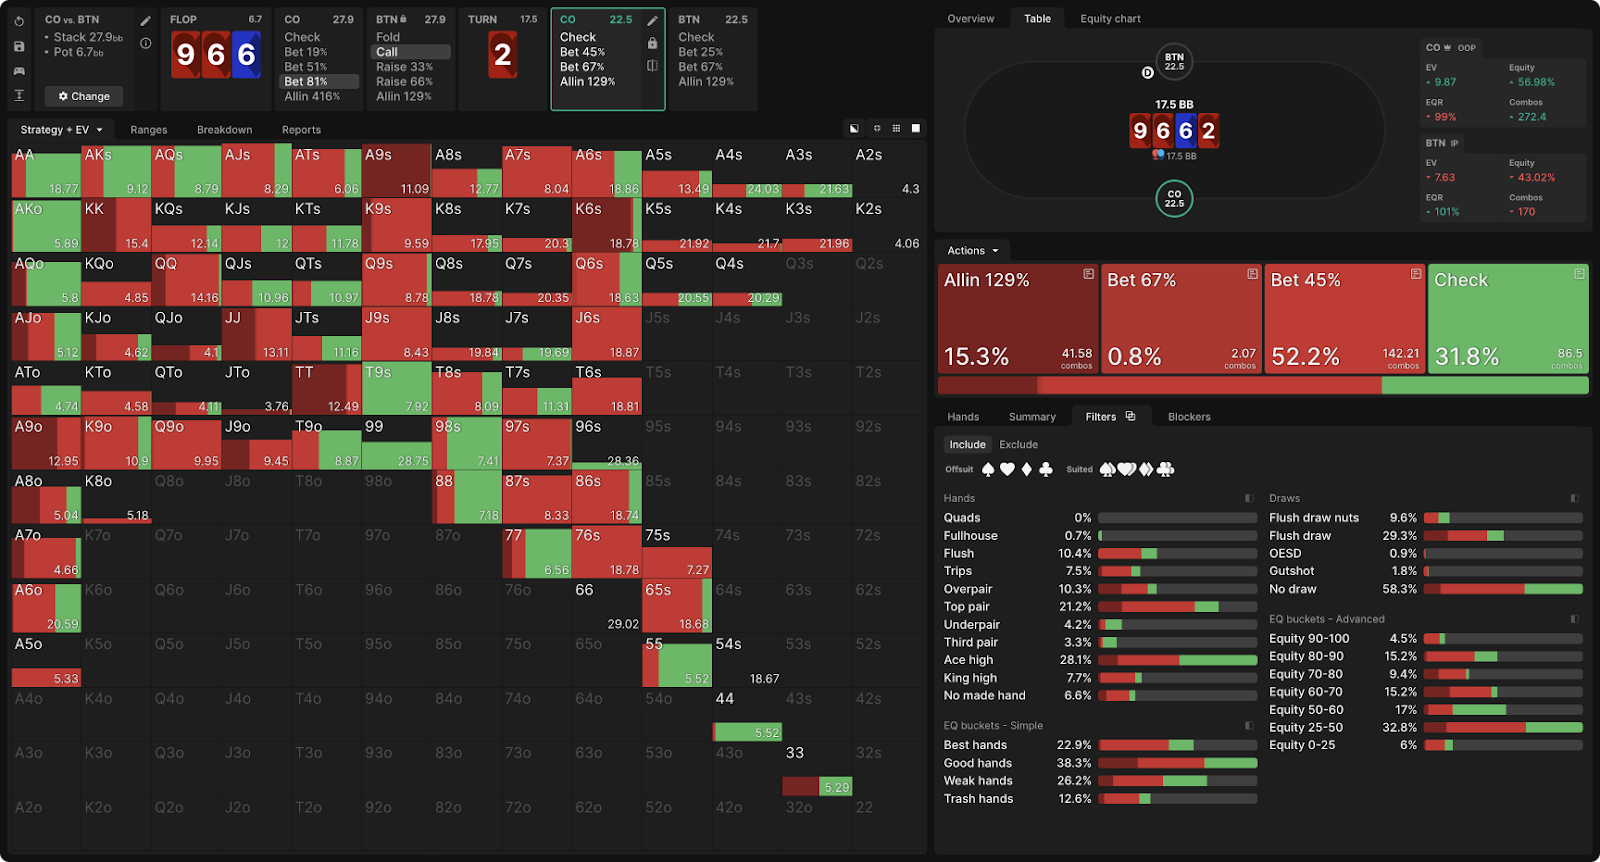
Here's an equilibrium strategy:
And Exploit:
We also see that the solver offers to bet more often and less (25% of the pot), but the difference is less significant. However, keep in mind that the CO range for viewing the thorn is wider in the exploit scenario, so for example, Push 18% of its range in both scenarios means Push more hands in the exploit scenario. The same types of hands for the push as the top pair A9 and draw, but CO has more such hands, because it more often bets on the flop.
- Example: it has an additional incentive to bet on the AT flop because it works very well against backdoor draws such as KT, QT, and JT, which are disproportionately represented in the extended range of the BTN call. When 10 turn, AT becomes a great push, because you can get a call from 10 to worse, while at the same time depriving QJ and KJ of a large equity that could profitably to call smaller bet.
Thus, the catoff EV increases significantly in the exploit scenario, although its strategy is not much different. He earns 8.9 BB on EV, as opposed to 7.4 BB in the normal scenario. Even on the turn ![]() that closes the most obvious draw, BTN simply has too many hands with low equity and is vulnerable to small bet. The equilibrium CO strategy proposes to put 45% of the pot with 16% of the hands on this card, while the exploit strategy proposes to put 52% of the hands with the same sizing.
that closes the most obvious draw, BTN simply has too many hands with low equity and is vulnerable to small bet. The equilibrium CO strategy proposes to put 45% of the pot with 16% of the hands on this card, while the exploit strategy proposes to put 52% of the hands with the same sizing.
And this is despite the fact that CO has a wider range in the exploit scenario!
BTN faces a familiar problem: too many backdoors that close. Hands like the A7, A8 and can![]()
![]() 't withstand even a modest amount of pressure on this turn. Gatshots, such as
't withstand even a modest amount of pressure on this turn. Gatshots, such as![]()
![]() , also just pass. Not even all BTN worm draw can continue!
, also just pass. Not even all BTN worm draw can continue!
Some weaker floats with overcards folds are reset, despite the presence of draw:
You may wonder why BTN would even want to call a flop with such hands if it then had to fold in response to a small bet on the turn that improves it. The answer is that in equilibrium he wouldn't, at least not as often. His exploited tendency to call too often on the flop is what creates such a mess for him.
Now, with too wide a range on the turn, the best he can do is fold his many weak hands.
Keep in mind, this is the best he can do. Even if BTN drops those weak hands, CO's exploitative strategy will make a profit. But these folds are not forcibly blocked in the solver. This means that he considered other options, such as bluffing or floating a second time, and found them to be no more profitable at best. Thus, the frequent use of barreling here does not depend on your opponent dropping those weak hands on the turn for profit. If he refuses to fold, your bluff may lead to a loss of money, but you will more than compensate for this with your valley bets. Once a BTN comes on a turn with too wide a range, it doesn't have good options. This is what exploits the extended bet range of Co.
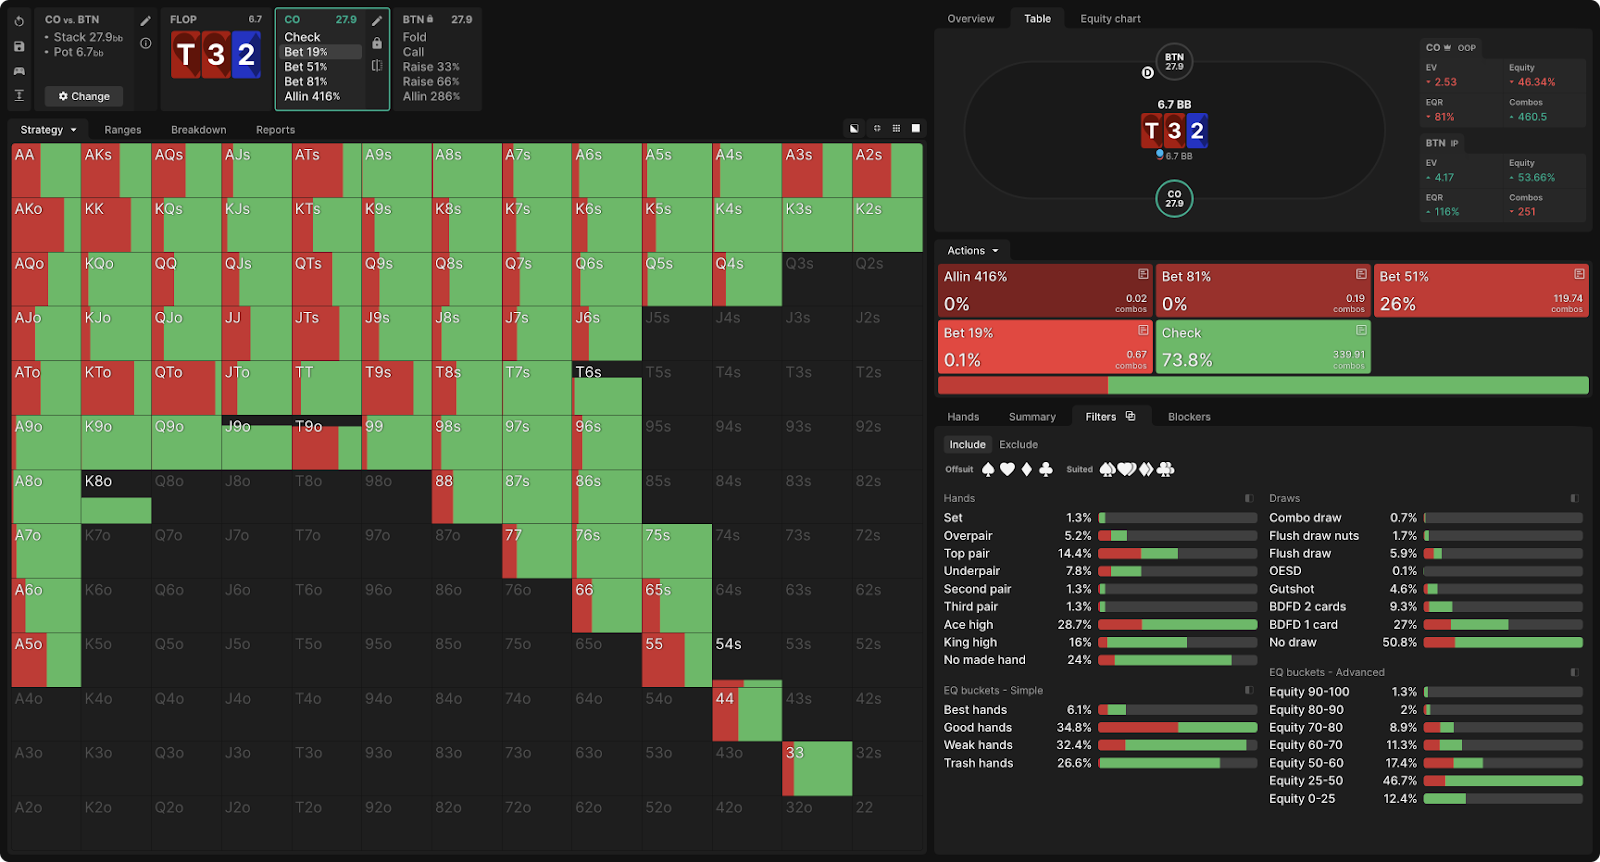
4. cbet on low flop
The equilibrium CO strategy on the flop ![]()
![]()
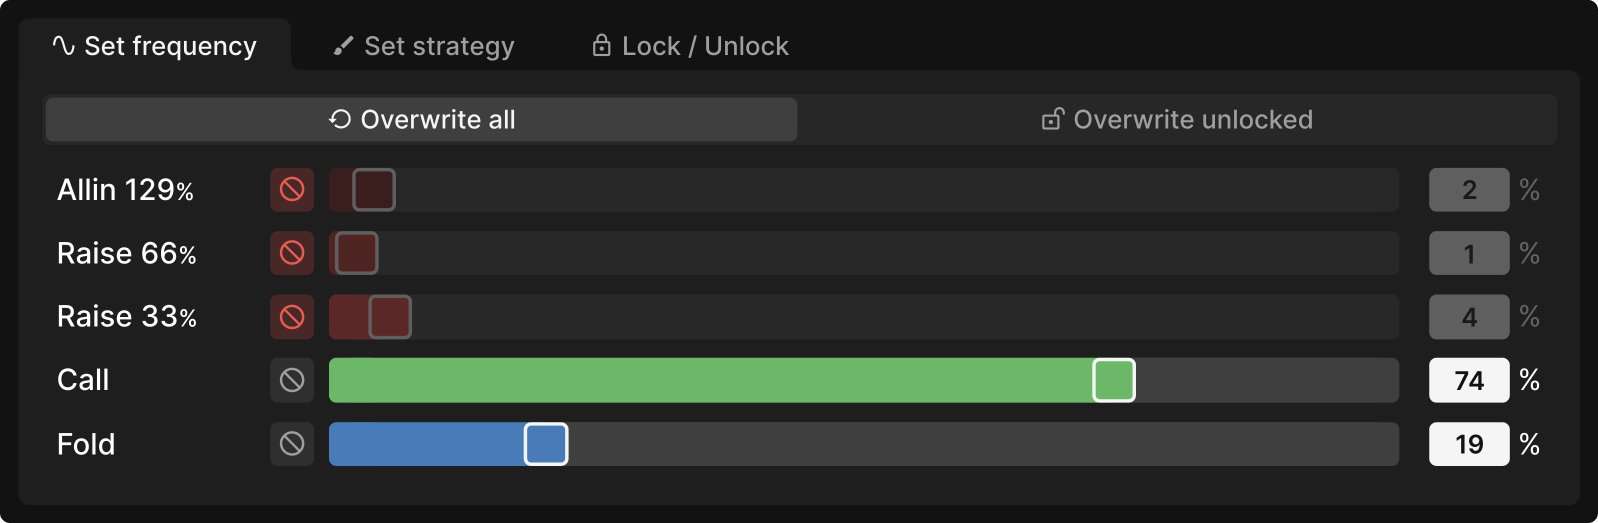
![]() is to check your entire range, which gives an EV of 2.45 bb. Although the continued bet is not part of the CO equilibrium strategy, BTN's response to bet sizes is still an important part of its equilibrium strategy. Remember: an equilibrium strategy does not imply that the opponent will also use it. Rather, it is not an exploitative strategy to respond to any action an opponent may take. So, we can still see how often BTN will fold in response to different bet and then force the solver to fold half as often as in the example above.
is to check your entire range, which gives an EV of 2.45 bb. Although the continued bet is not part of the CO equilibrium strategy, BTN's response to bet sizes is still an important part of its equilibrium strategy. Remember: an equilibrium strategy does not imply that the opponent will also use it. Rather, it is not an exploitative strategy to respond to any action an opponent may take. So, we can still see how often BTN will fold in response to different bet and then force the solver to fold half as often as in the example above.
5. Clamp the aggressive racer
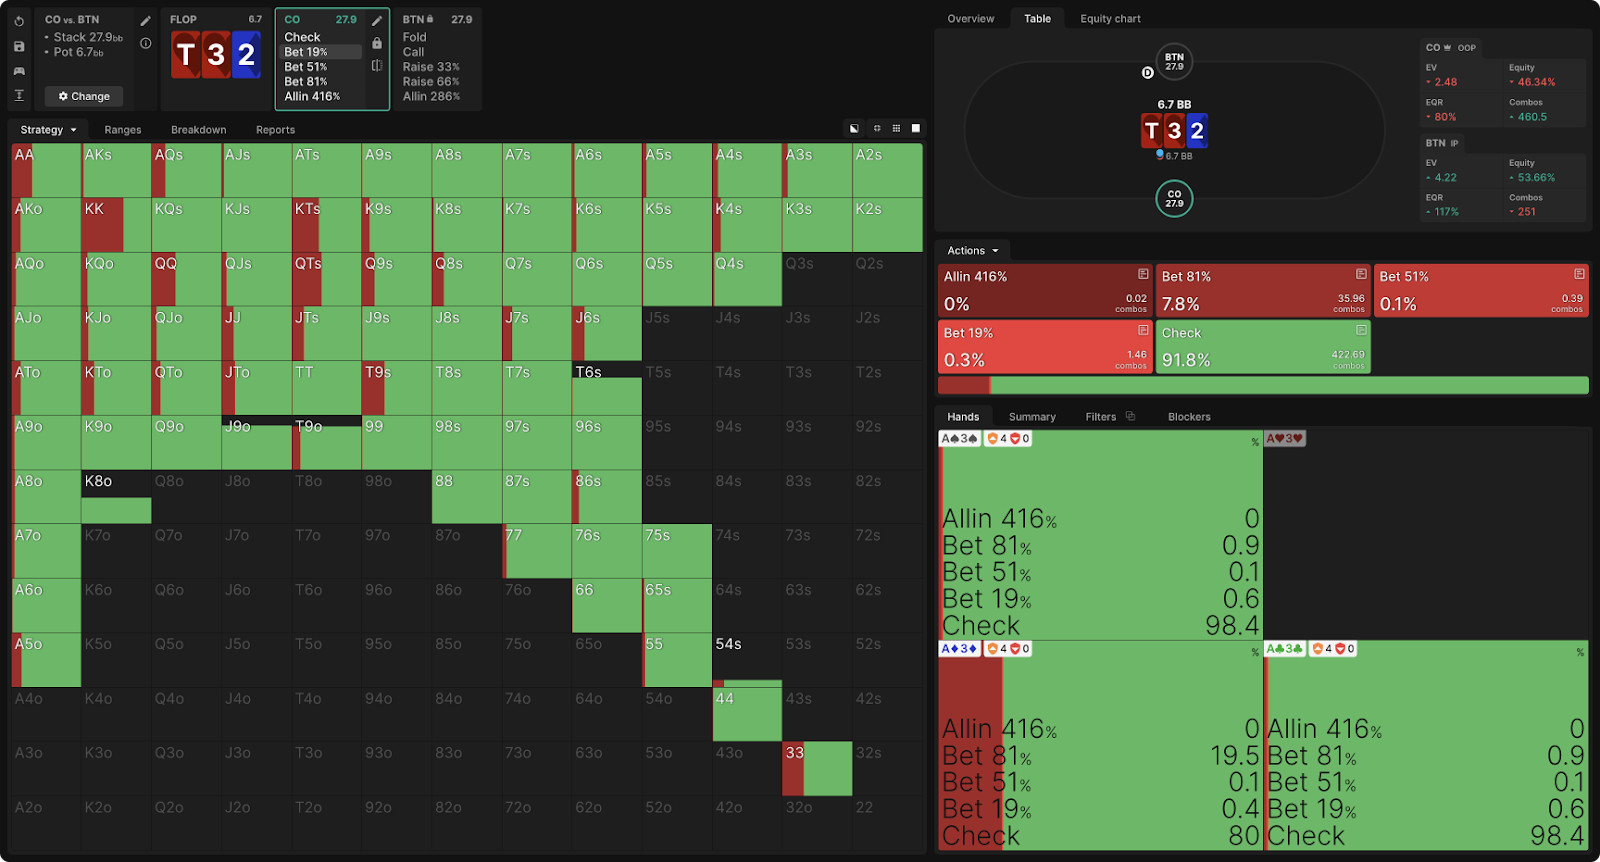
When we give Button a reduced fold on this flop, it corrects itself by raising hands that would otherwise pass. Thus, we created an overly aggressive racer. Let's see how to deal with it.
Against a button that is excessively bluffing, CO increases its EV to 2.53 bb, extending the bet range:

Naturally, this range is focused on strong hands, but the strategy is not as simple as “put all your best hands on”. CO never puts nuts that have a strong blocking effect on the BTN raise range. He only puts other strong hands like AA and KK from time to time. The hands CO most wants to bet with are bet hands of medium strength, strong enough to go all-in on the flop, but also vulnerable enough to benefit from fold equity.
This includes:
- A lot of top pairs;
- Multiple junior pocket pair;
- The best odd hands.
If these hands benefit from fold equity, why does CO want to bet with them against an opponent who does bet? BB still has a fold range. It is weaker than it would be in equilibrium, but includes hands with real equity against AK and KT. Unlike TT or AA, these hands are quite vulnerable, so they get enough benefit from the fold even the weakest part of the button range. But they are also strong enough to withstand further action from an opponent who rarely folds. As in the example with the 9-6-6 board, CO puts even on the worm some rather weak semi-bluffs, such as QJ. In addition to their blocking effect, they will be good barrel candidates for putting pressure on a too weak BTN range on many thorns.
In the case of a raise, the CO plays an almost pure 3bet strategy:

If you know that your villain will rarely fold and over raising, you should not bet with hands that do not stand the bet. And since CO prefers to bet with strong but vulnerable bet hands, they are more likely to 3-bet than call to deprive the equity of an opponent and not to play the turn without a position. Essentially, he makes a bet to trigger a raise from an overly aggressive opponent and then a 3-bet to lock in his equity. Hence the expression "zarkanit".
6. Floaters
Excessive call is much less operational than excessive raise, since it forces CO to play without a position on future streets and does not allow depriving an opponent of equity and ending the game on the flop with a reraise. In fact, the ease with which BTN can float on the flop and replay on subsequent streets is the main reason why CO does not make a continued bet in the equilibrium strategy.
Opponent's puncture (in position) is much less usable than his excessive raise (also in position).
We can test this by setting the BTN strategy so that it folds half as often as usual, while leaving the frequency of the raise unchanged:
CO can exploit this imbalance in as little as 2bb/100 using a narrow bet range:
As we have seen in previous bet exploit ranges, this range is disproportionate and not exceptionally strong.
It includes some semi-bluffs that may continue to put pressure on the turn. However, mostly CO is still checks. Being out of position on such a dynamic board is just a huge disadvantage. BTN has an incentive to invest a lot of money in future decisions after a CO check, so even when CO knows it's going to be over-call on the flop, it's still waiting for a lot of strong hands to come in.
7. Conclusion
Stubborn, "sticky" opponents are of different types:
- Some of them are loose and passive colling machines that just want to see more cards;
- Some like to bluff, while others prefer to float instead of bluff on the turn.
On closer examination, we could design thinner exploits for each type. However, it is important not to allow the best to be the enemy of the good. You don't need a clear reading or even a prediction of how your villain will react to the exploit in order to profit from
it.
- We, for example, have found a powerful and profitable way to determine that our villain is not folding enough, without wondering if they are going to call more or raising more, or how he will fold on the turn.
If your villain doesn't fold enough, you should bet more often, including in situations where you don't normally bet at all. Your bet range should be large with a value of hands, but your best hands will not necessarily be the ones that will bring the most benefit from the bet. The best bets are hands that are happy with a wider range of call (including strong ready hands as well as some semi-bluffs). At the same time, they also benefit from dropping the opponent's weak hands. Then, on the next street, you continue the aggression, using both Velu Beta and bluff. This will allow you to profit from your opponent's too weak range, no matter how he responds to it.