


Translated with the help of AI. We apologize for any errors and would appreciate your help in correcting them.
Translated by order of the educational portal university.poker
Original source: GTO Wizard

My favorite way to study GTO Wizard is an experimental approach based on the scientific method. This means that I start by formulating a hypothesis and then analyze the data or run experiments to test it. When I began to study the situations where the small blind (SB) made a limp and called a raise from the big blind (BB), my hypothesis was that these scenarios would resemble confrontations between the button (BTN) and BB. In both cases, the raiser from a late position fights for the pot with a player who calls without a position, completes the pre-flop action and receives a discount on entering the pot. It turned out that I was only partially right. And the part where I was wrong turned out to be more important.
1. Donk-bet
In the part of the hypothesis where I turned out to be right, after the limp and call on the preflop, SB rarely makes a dock bet on the flop.
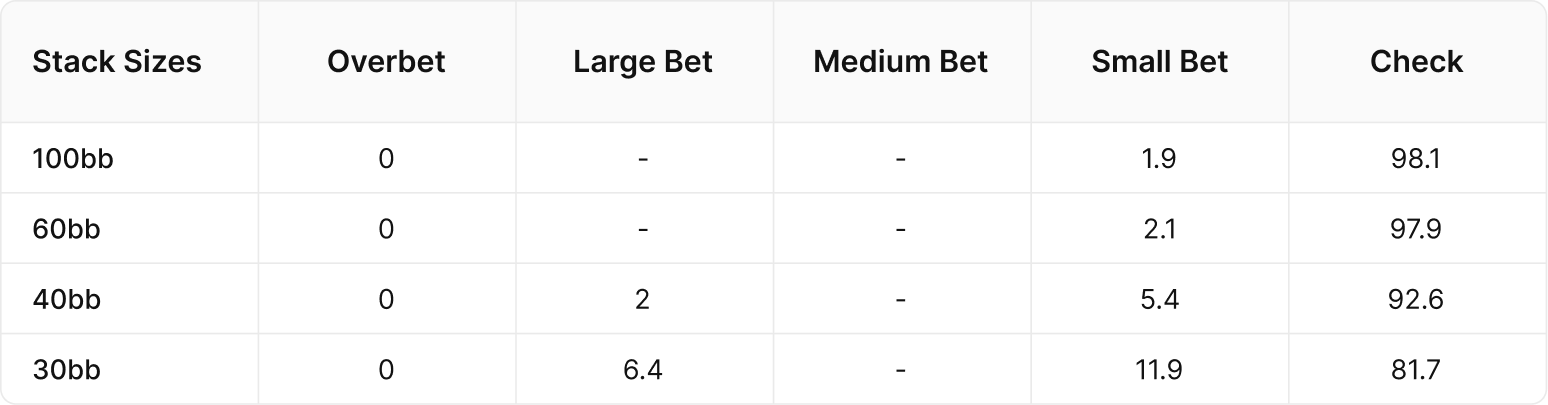
Only at the shortest stacks does dock bet become an important part of the SB strategy. Having given up two opportunities to show aggression on the preflop, SB is unlikely to have such strong hands as overpairs or a top pair with a strong kicker to stack-off on 40+ big blinds. Stack-off at 20 or 30 BB is more justified with any top pair, so SB can start dunking when it has a short stack.
2. c-bet
A more significant error in my hypothesis was the assumption that BB would make a c-bet against SB with almost the same frequency as a button vs. collier raiser on BB. At all depths of the stack, BB makes a check on average 40–50% of the time:
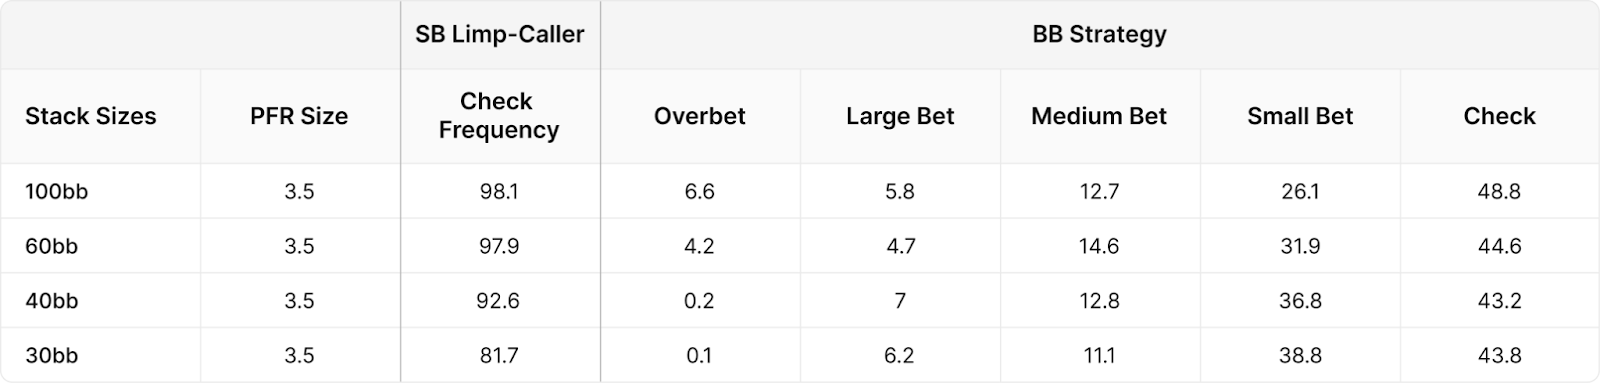
BB does not make a c-bet against SB as often as a racer from Button would do against a BB button. As the stacks decrease, BB uses a less polar counterbet strategy, betting more often but in smaller sizes. This, however, is not an entirely correct comparison, as BB uses a slightly smaller pre-flop raise size for stacks in 20 BB. This improves SB's chances of call, prompting it to see a flop with a wider and weaker range that BB can attack with small bets on the flop.
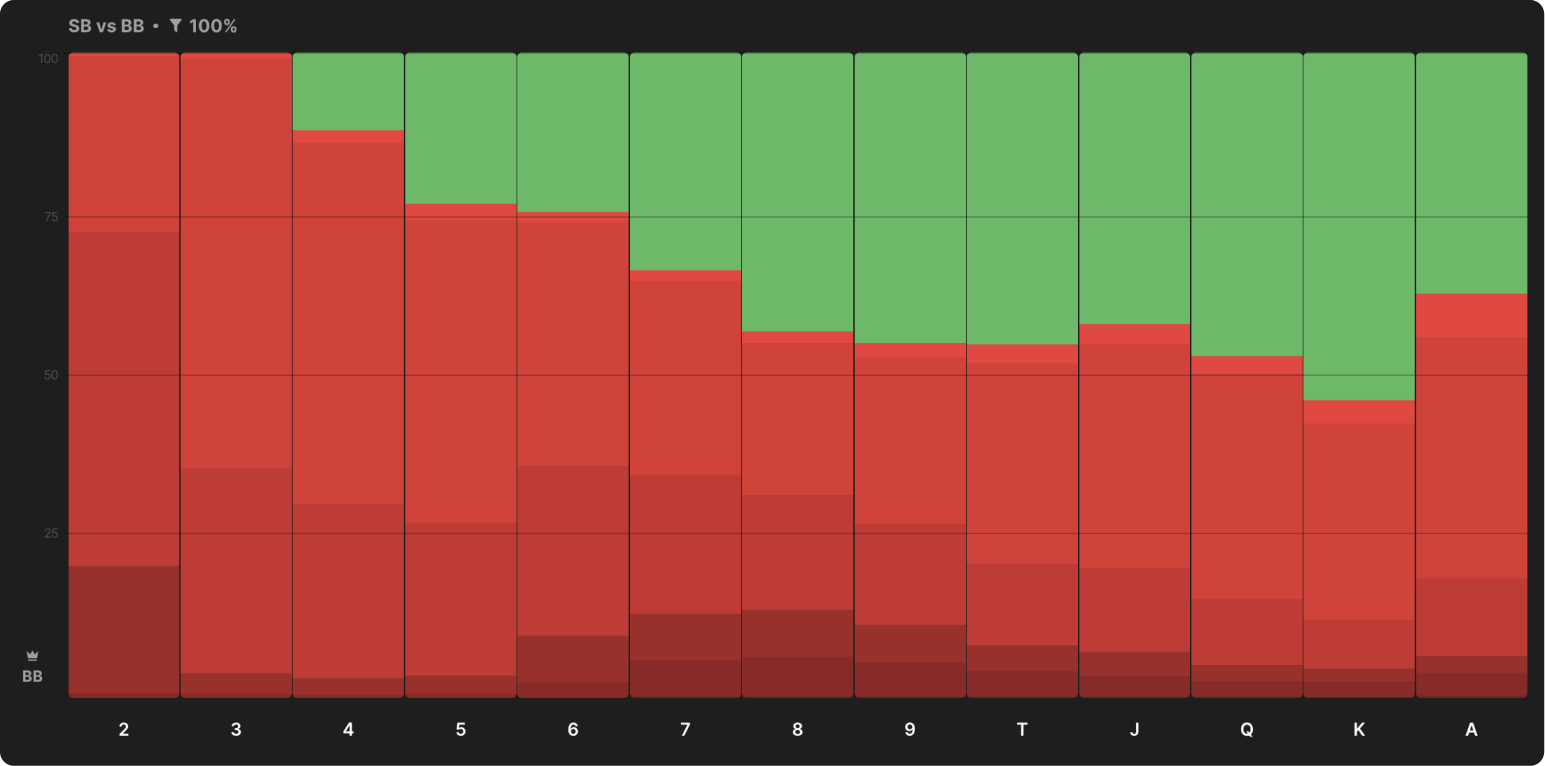
3. Which flops to use for c-bet
The next discovery for me was the flops, on which BB prefers to do c-bet. For a racer in position that makes a c-bet against BB, ace flops are usually ideal. However, it is the ace flops that show the lowest counterbet frequencies in BB vs SB, at least in deep stacks. The data in the report on flops for 100 BB stacks confirm this.
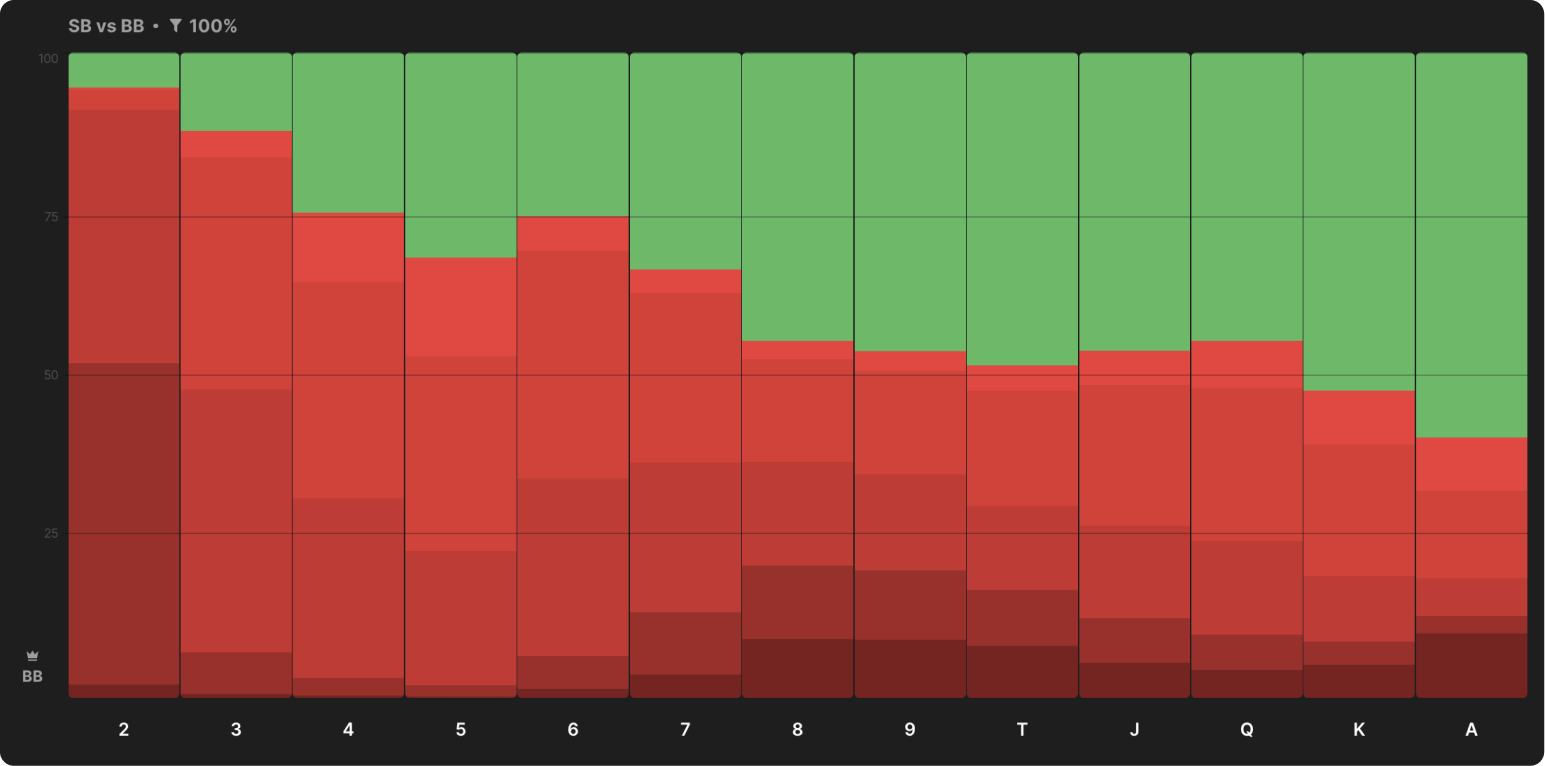
(grouping by the highest flop map)
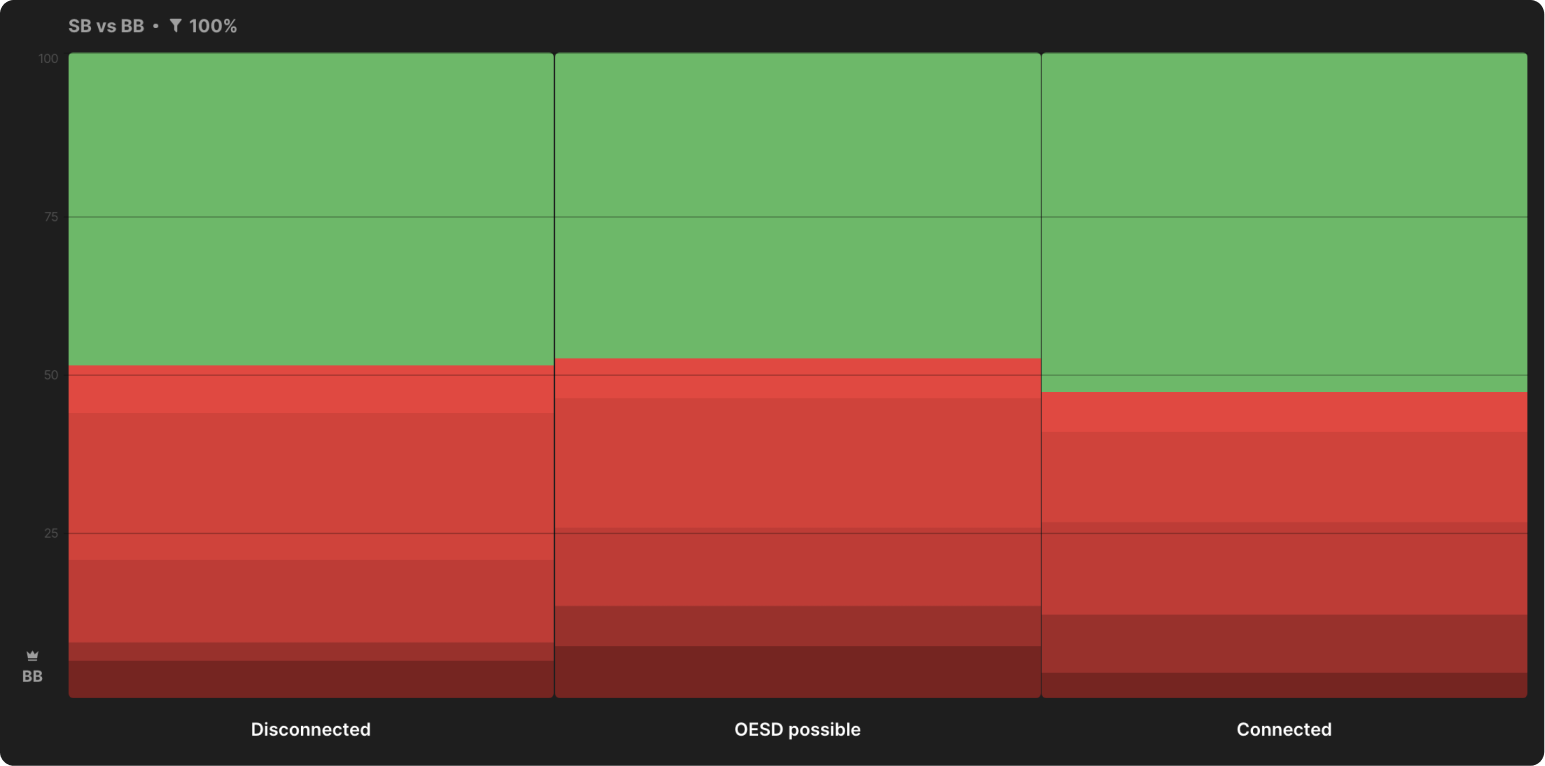
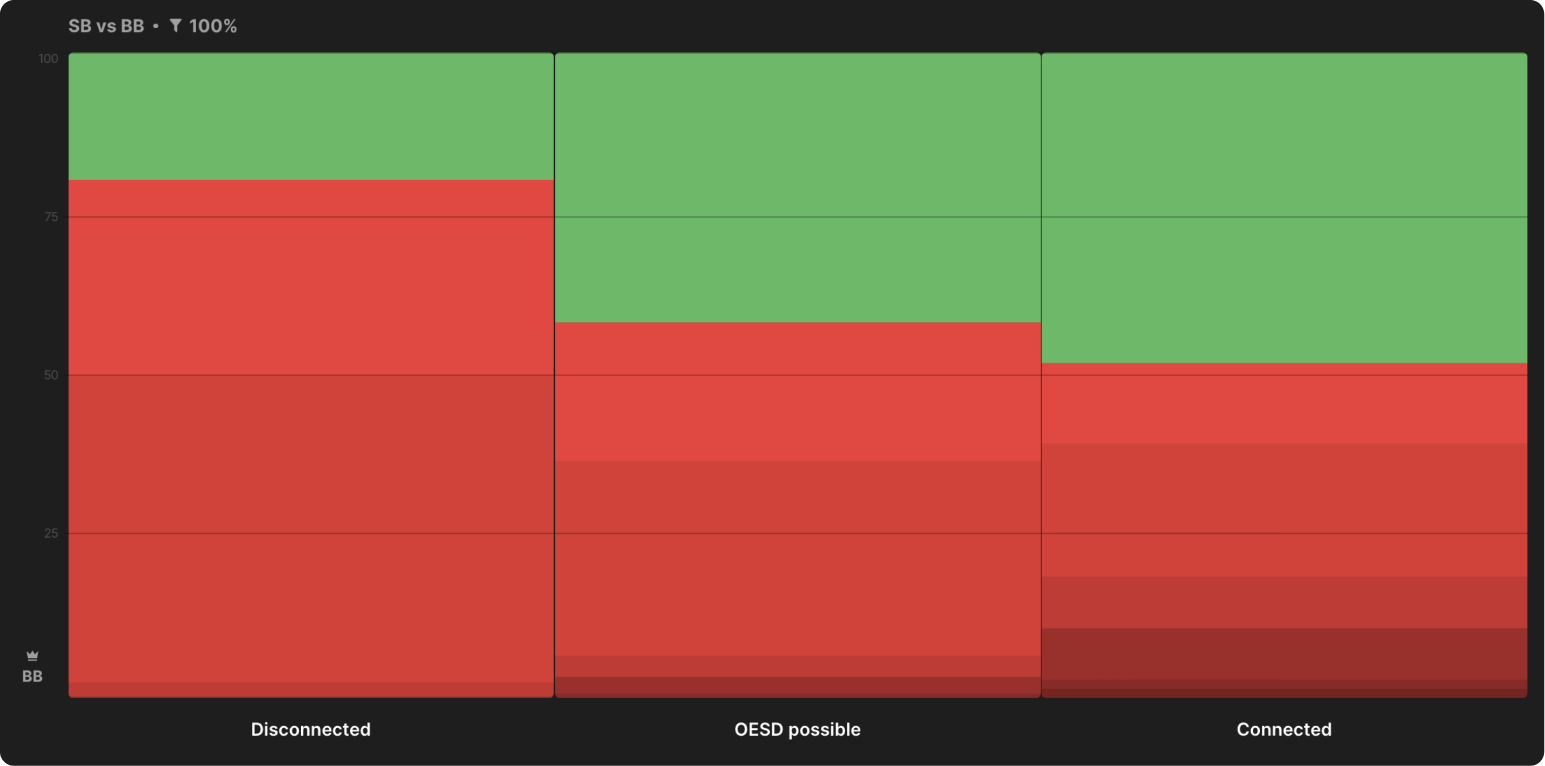
At such a depth of the stack, we also do not see a clear preference to bet on disparate flops, as happens in a pot with one raise (SRP) between the button (BTN) and the big blind (BB):
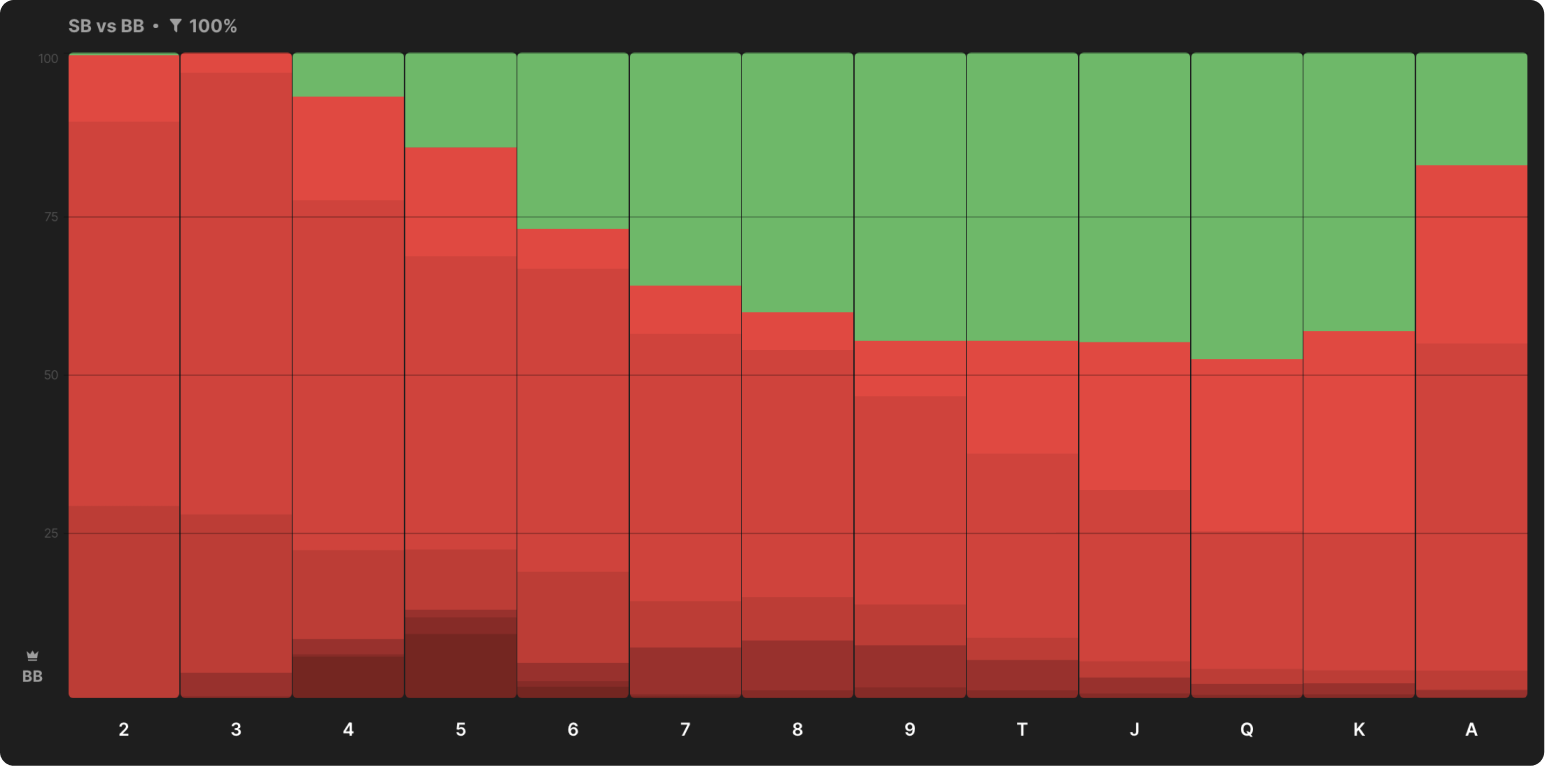
As the stack decreases, the ace flops become a little more suited to BB's counter beta, but the overall trend remains the same: higher cards are less advantageous to the counter beta.
Here is the general counter-beta strategy at the depth of 40bb:
Only in the depths of 20bb does the counter-beta strategy BB begin to resemble the strategy against BTN, in which less preference is given to flops with medium, linked cards:
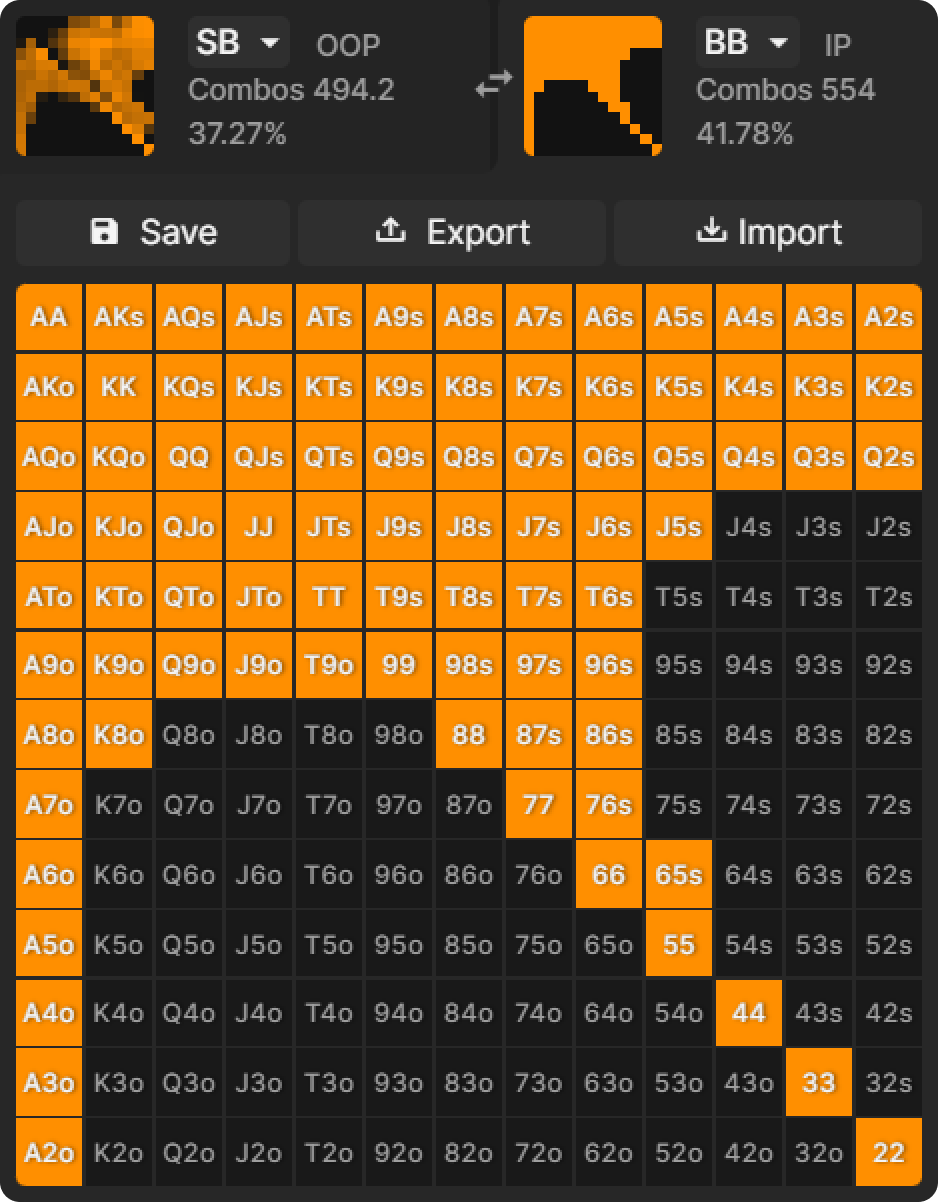
4. Polar preflop range BB
The reasons for these features are related to the BB pre-flop range, which is very different from the rise ranges at any other position:
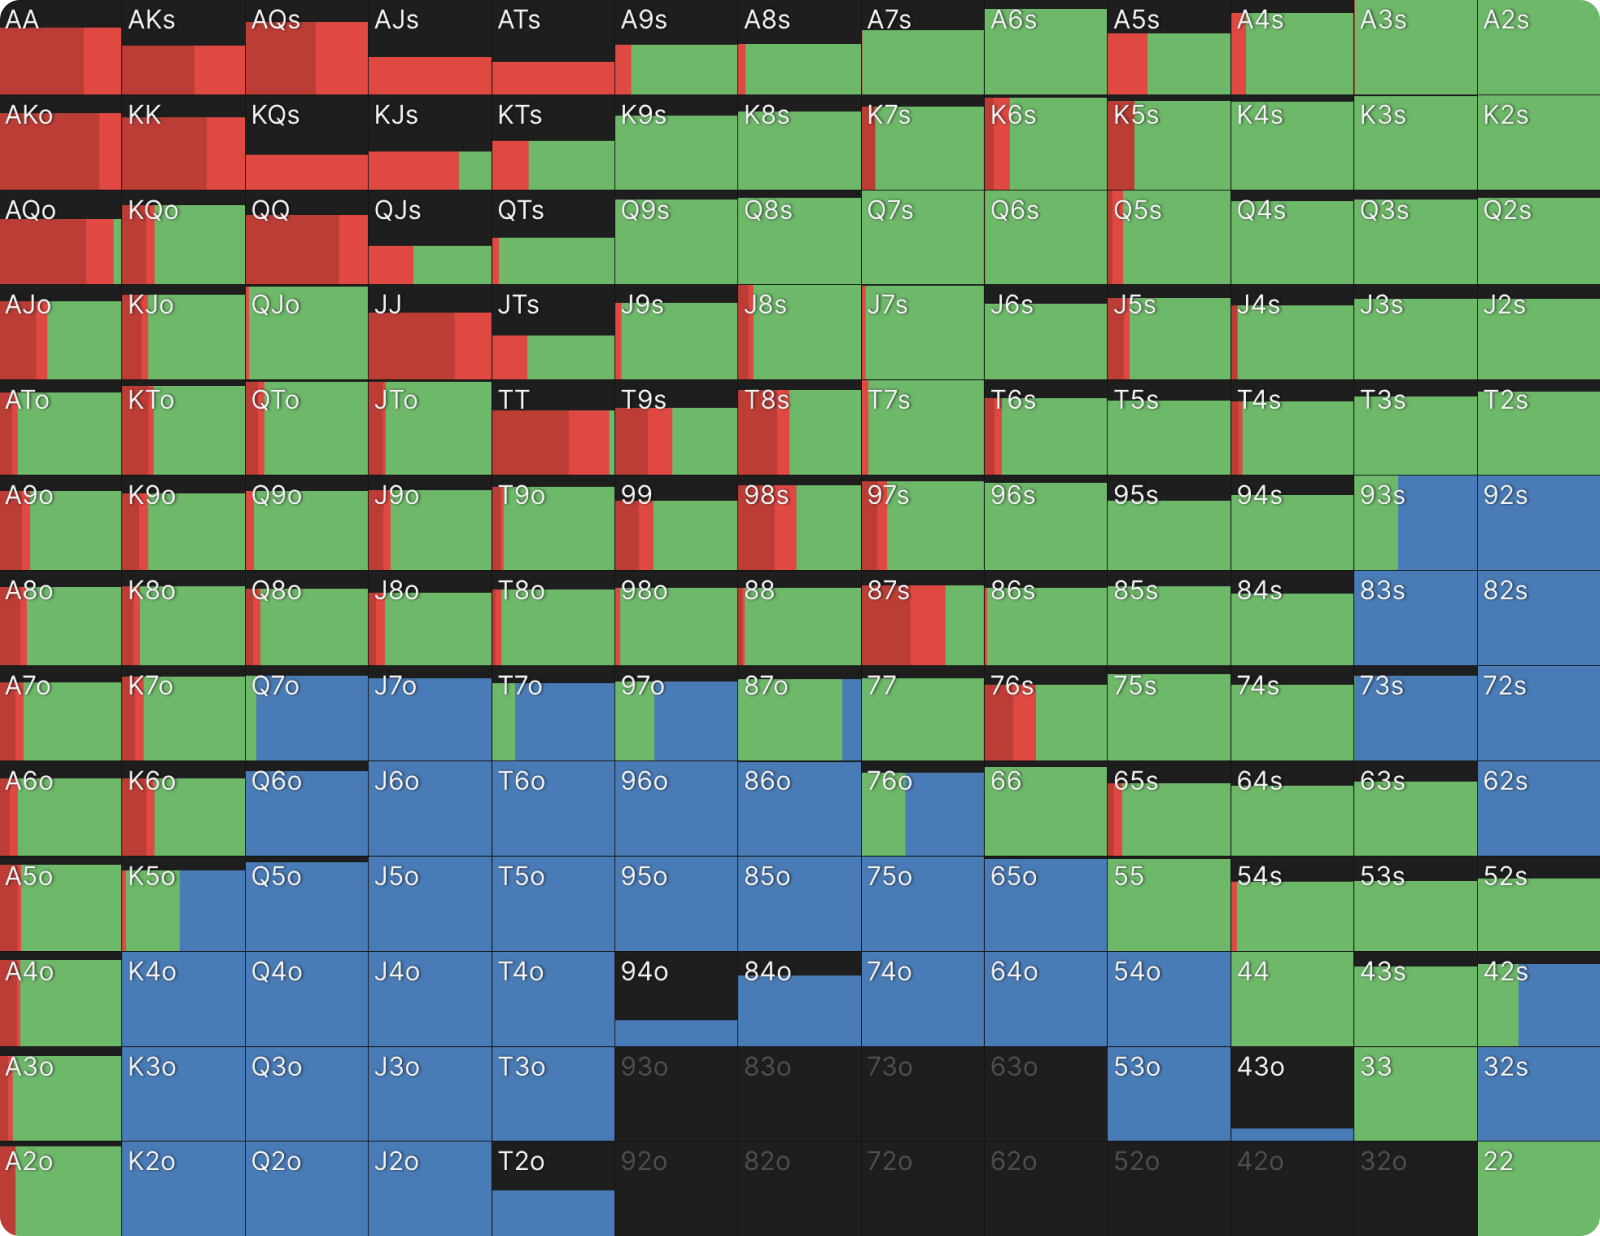
BB vs SB limp strategy, MTT ChipEV simulation at 100bb depth:

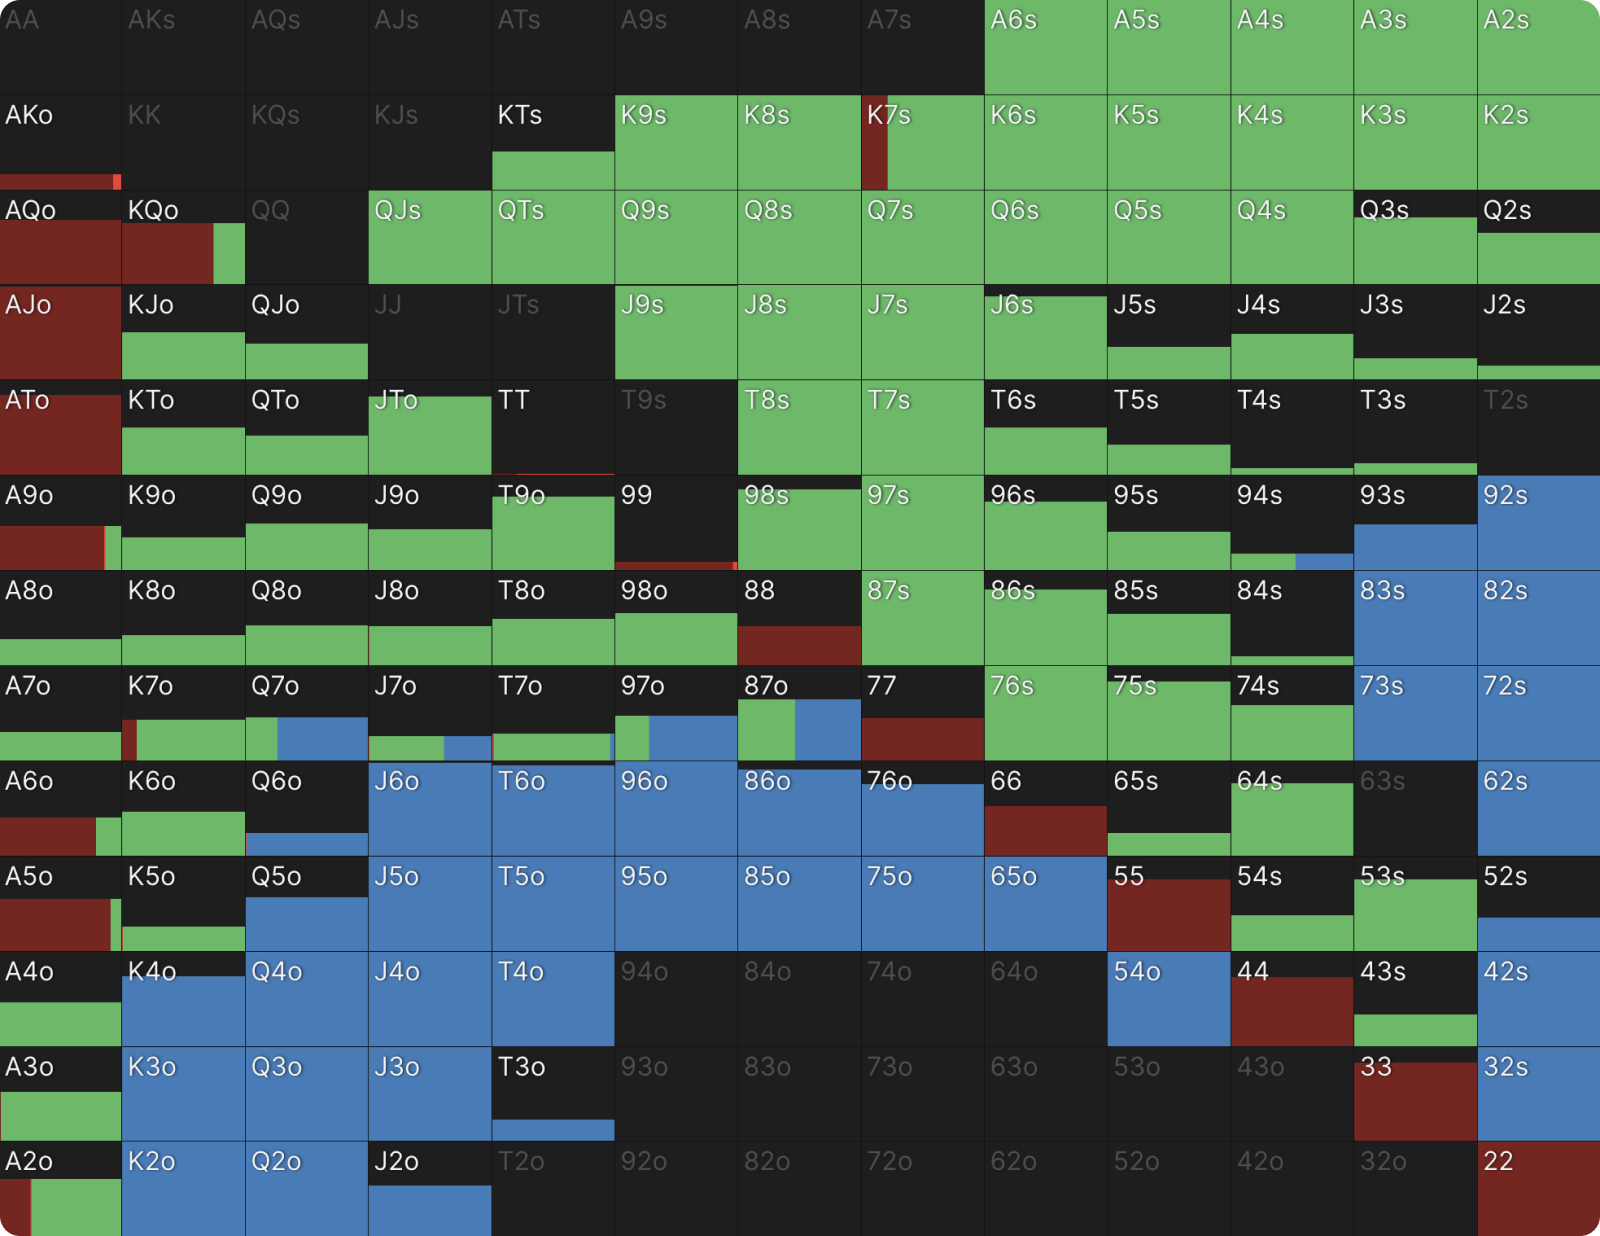
For comparison, here is the BTN raise range in a similar situation:
For BTN (or any other position before SB), call, as the first action in the bank, is usually unprofitable. When a call is not considered, the raise range is usually linear (unless all-ins are included). There is no point in dropping stronger hands and playing with weaker ones. However, for BB, the alternative to the raise is not a fold. The check is a very lucrative option: it costs nothing and guarantees BB the opportunity to see the flop, while the raise resumes the action and creates the risk of 3bet from SB. As a result, BB often plays a check with medium strength hands that would be difficult to continue against 3bet and raises weak hands such as 92o and 84o.
These weak hands have fold equity, since they can force the dominant hands to fold, and they lose less in 3-beta, since they are unlikely to win the pot in passive play. To be clear, the Q7s (a recommended check in this scenario) have much more EV as a raise, compared to the 84o that are frequently raised. However, Q7s also have a higher check EV. What is more important for BB is not which hand brings more EV in a raise, but which hand retains or does not lose EV in a raise compared to other available actions.
Example:
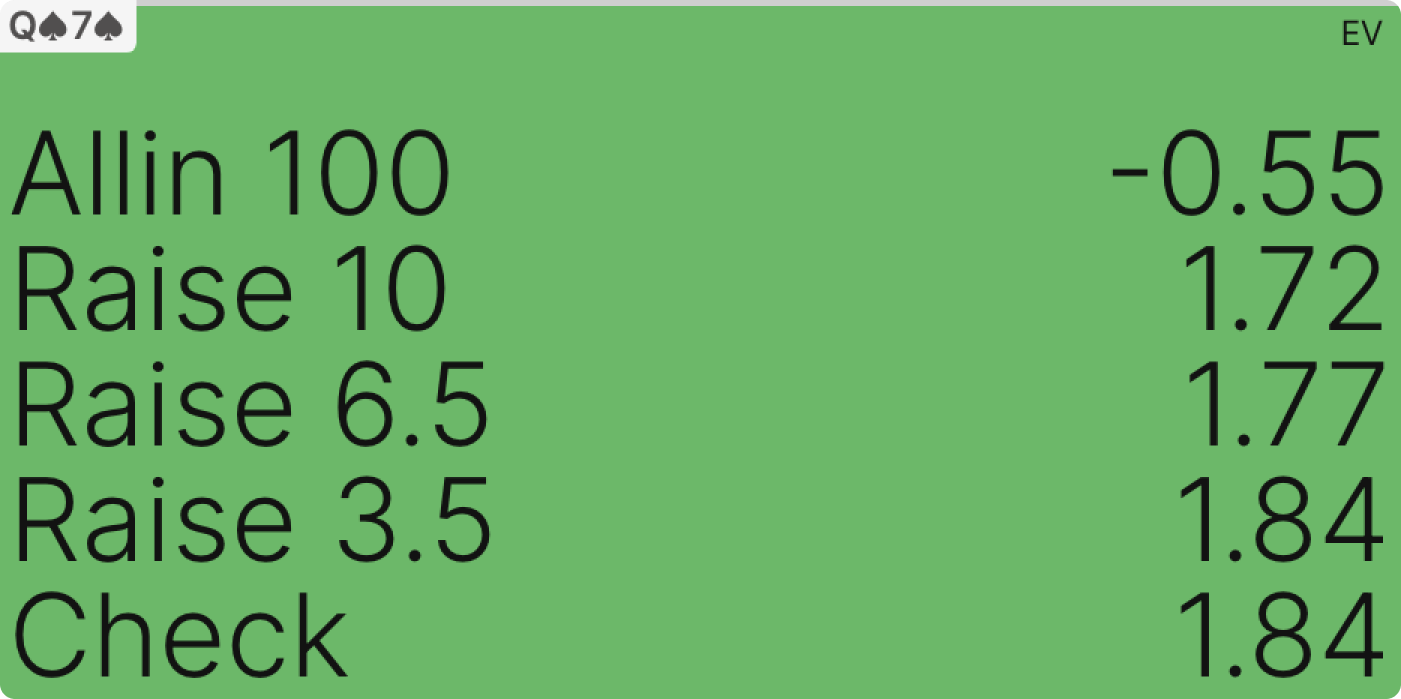
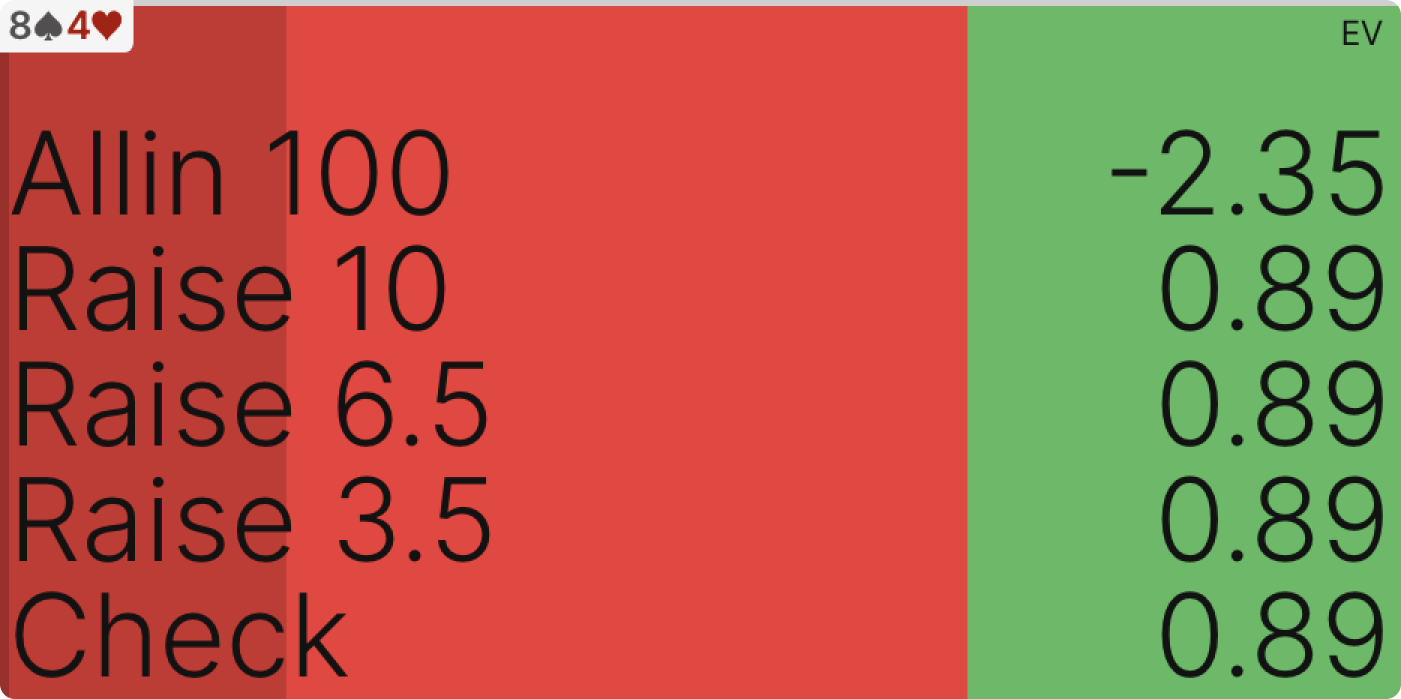
Low offsuited A-x are widely represented in the BB check range as their raise often causes the dominant hands to reset while increasing the pot against the dominant hands.
The SB Limp Call range mainly consists of A-x:
With smaller stacks, this becomes less important. A-x hands are safer for both players to all-in on preflop, so they can be played more often through the raise. This leaves BB with more hands in the raise range and SB with fewer hands for the limp call. (If the difference is not visible in the following images, it is useful to remember that suited A-x includes only 4 combinations, while offsuited A-x consists of 12 combinations.)
5. VV strategy vs. SB limp, MTT, chip EV model in depth of 30 VV
SB's response to the BB iso-raise is also shown below:

6. Updated hypothesis
Now that my initial hypothesis has proven to be inaccurate, the next step is to test an updated hypothesis that better explains the data. Probably, the strategy of c-bet BB vs. limp-call SB differs from the strategy of c-bet BTN vs. collier on BB, since the preflop range of BB rise is more polarized than that of BTN. This leaves BB with less of an equity advantage on the post-flop, especially on those flops that otherwise would normally benefit the pre-flop riser equity. To test the hypothesis, I conducted a custom simulation in which the player on BB razed with about the same frequency – 42% of the hands, but instead of the more polar strategy used by the solver.
I constructed a linear range from the best 42% hands:
If a player on SB knew about such a BB strategy, he could make significant changes to his preflop strategy to exploit it, but this is beyond the scope of this experiment. To avoid variables, I left the SB range unchanged. We can't run reports for custom simulations, but I chose a scattered flop with an ace (AJ5r) to compare my simulation results to a pre-calculated scenario where BB uses the GTO range. The differences turned out to be significant: if the GTO strategy puts about half the range, then the user simulation puts with almost 80% of hands and uses more large bet.
7. Comparison of C-beta strategy BB vs. limp-color SB, depth 100bb, ChipEV


This is logical, since the linear range includes all combinations of A-x, whereas GTO simulation often plays a check with weaker A-x. On some GTO flops, the strategy will be more effective, but in general BB will be more likely to place large bet after the rise of the linear range, since such a range is stronger and more likely to have equity compared to the polar range.
8. Conclusion
If the BB linear range is stronger and performs its role better after the call from SB, then why is this not a GTO strategy? Why isn't it more profitable? We analyze only the part of the decision tree where the linear range concentrates the equity. To evaluate the entire EV preflop strategy, you need to take into account how BB copes in spots where limped pots are played. The linear range can be expected to lose EV in limp banks compared to the GTO strategy. The concentration of force in the raises makes BB vulnerable to SB aggression, especially on boards with an ace where BB will never have a top pair (because he check “behind” his hands without an ace). That's what makes learning a solver game so interesting and rewarding.
Working with solvers is not about remembering range, it's about finding unexpected results and figuring out what's behind them.
In this way, a deeper understanding of the basics of poker is accumulated, which helps in various game situations that go beyond the initial request.